Sunday, December 27, 2009

Laura bag complete!

Here is the finished version of the bag for my sister. I ended up lining it with home decor weight fabric that I had left over from a project to give it weight and strength. It is completely reversible with buttons on each side. The patterned fabric is from Amy Butler.


Wednesday, December 23, 2009

Christmas continued...

Here is an example of a present I bought for myself! It was a black Friday (or Saturday) deal at Joann's. Normally $200, on sale for $79. I couldn't resist. There is just something about having one of every color that I can't resist. I always HAD to have the biggest box of crayons for school and I could just look at them all and feel happy. I feel the same way about this case of thread.

And here is another shot of my sister's naughty cat - this time climbing the Christmas tree and knocking off the ornaments!

Christmas time means finishing old projects and starting new ones

I took this week off and am spending it at my parents' house. My sister is here too and brought her cat. Between her cat and my dog, I think you will see an animal in almost every picture! I have had lots of time to work on crafting and have finished up several projects and started a couple new ones. My next few posts will show of some Christmas presents I made for others and some that I got! Here is another koozy with a new type of embellishment - the hand-stitched patch!


PS: I didn't try to get the cat in the picture - he just jumped into it and posed!

Sunday, December 20, 2009

Sunday, December 13, 2009

Laura bag prototype

I am working on a design for a bag for my sister. She wants a tote-type bag to carry her books etc. around to her grad. school classes. She asked for something that might be able to be reversible, has cool fabric and a funky button and has room for books. I didn't want to start trying to design something with cool fabric, so I started with this left-over fabric I have had in my closet for a few years just to get the general measurements and the shape figured out.

Here is the fabric I plan to use (both Daisy Chain by Amy Butler). The questions are: How is the shape/size? Should I add some sort of flap at the top for the funky button (that I haven't picked out yet) or should I just stick it/them on there as a decoration? Also, should I do all one fabric on the outside and the other on the inside, or should I make the pleated body part one fabric and use the other for the top? Maybe I need a coordinating solid for the top/straps?


This is the first shot I tried to take. I guess my dog thought that since I was sitting on the floor that I must want to play with/pet him!

Wednesday, December 9, 2009

Wednesday, December 2, 2009

Thanksgiveaway winner!

Thanks to RANDOM.ORG a winner has been selected. The crocheted bag will be going to lucky number 3, Laura! At first, I thought, "what are the odds my very own sister would win?!?!". But then I realized...1 in 4 :) So, Laura, you can expect to get this at Christmas!

Monday, November 23, 2009

Purse Size Margaret Bag

Last weekend I made two purse size Margaret bags. I used the pattern from Oh, Fransson!, but shrunk it and made some adjustments to the other measurements to make it a purse. I was able to fit 2 on the 1.25 yards I bought for the large size bag. I used home decor fabric and only used one layer of interfacing instead of all the layers the pattern calls for. This worked fine since the fabric was thicker and saved some money!
Here is a comparison of sizes of the purse size and the shoulder bag size.

Sunday, November 22, 2009

Thanksgiveaway!

Crochet Grocery (or Anything) Bag Giveaway!
Due to the small response to this giveaway on the first time around (i.e. the only comments were from my two close friends), I have decided to extend the deadline for comments until December 2. Of course, Andrea and Jenni will still be in the running to win the bag. Plus, for being so patient, they will both get a special gift (yet to be determined :))! So, if you want this bag to be your own, just leave a comment and let me know how you will use it!


As you can see, I decided to fill my bag with yarn, but you could use it for groceries, or anything else you can fill it with. It doesn't take up much space, so is easy to carry around and use instead of plastic when shopping. If you want this bag for your own leave a comment saying how you will use it. On November 22, I will draw a random number and announce the winner!

I made this bag following this tutorial from the Purl Bee. Instead of linen, I used cotton. The best part is that it was from thread I already had! My husband's grandmother got me an entire bag of crochet thread from an auction. When she gave it to me a couple of years ago I wasn't really doing any crocheting with thread, but have since done a few things. I found one skein of this thread and started the bag, soon to find out that the one skein would not be enough. Shortly thereafter, I found out that this exact line of thread is not made any more! How lucky was it that I dug down in the stash and found another skein of the exact same thread!?! It worked out perfectly!

Another funny coincidence - I decided to put some smaller skeins of yarn in the bag for picture taking purposes, only to see that one of those had a label with a pattern for a very similar bag!


Wednesday, November 11, 2009

6 to go

I my postings have been few and far between recently. I was gone to Hawaii for work, then my parents came to visit, and then we went to the in-laws' last weekend, so my crafting time has been limited. However, I did get some crocheting in on the 6 hr car ride. Unfortunately, a lot of it was in the dark, so I didn't get to use all 12 hours for crafting. I am now down to 6 skeins of yarn left for Mom's blanket that I am trying to get done for Christmas. Sadly, that means that I have only gone through 1 1/2 skeins since my last post about it in August. The longest side in this picture is actually the width, so I hope the yarn I have left will be enough!

The good news...I did finish a project over the weekend and I will be posting it soon. I think I will do a giveaway, so be sure to check back soon!

Tuesday, October 27, 2009

Scrap Buster Contest

In case you haven't seen...my mouse pad tutorial was posted on Sew, Mama, Sew for the scrap buster contest. Now you can vote for the best tutorials! The winners will win a $50 gift card to Sew, Mama, Sew. I could sure use that! :)

Also, I just got back from my conference in Hawaii, and couldn't resist coming home with some Hawaiian print fabric! I can't wait to make something with it.

Tuesday, October 13, 2009

My Very Own Margaret Sling Bag!


Earlier this year I read this post about the Margaret sling bag. I LOVED the bag and soon found my way to my now favorite site, Oh, Fransson!. The pattern for this bag was designed by Oh, Fransson! and she was kind enough to provide a tutorial. I have been wanting to make this bag for a while, but my upcoming trip to Hawaii inspired me to hurry up and make a bag that would be big enough to hold all my 'stuff' while traveling and conference-going, but neutral enough to go with a variety of outfits. An added bonus is that it is significantly better to look at than the lovely conference totes that get handed out!
I added this appliqué of a little bird to the pattern and also made the closure strap out of the interior fabric instead of the exterior.
This is the inside of the bag. It is reversible, but I probably won't use it this way. The inside has two pockets, although they are kind of hard to see with this patterned fabric. (The pen is there just to show where the pocket is)
I am really happy with this bag. I used it today and got lots of compliments. I am so excited that I finally made a bag!

This last picture has nothing to do with the bag or crafting. I just thought it was a perfect example of how Iowa weather goes directly from summer to winter without any fall. This was what I found in my yard Saturday morning!

Wednesday, October 7, 2009

Mini quilt mouse pad tutorial - scrap buster!


I have been wanting to make a new mouse pad for work for a while, and I have been wanting to make a blue and green themed quilt, and I wanted to participate in Sew, Mama, Sew's Scrap Buster Contest, so this seemed like the perfect project!

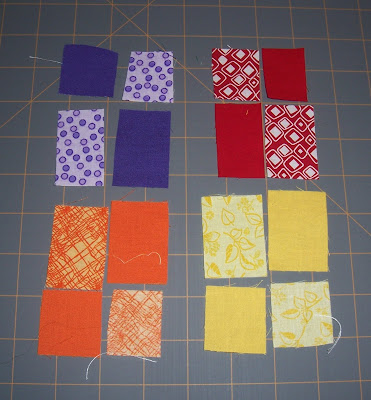
I started out with this pile of scraps from the baby quilt I made a while ago.

The strips that I cut for the baby quilt were all just a little too long, so when I trimmed them I ended up with relatively regular sizes of scraps of each color. I had a small rectangle of each of the solids and prints (about 1.5 x 1.25 inches) and a large rectangle of each (about 2 x 1.25 inches). I realized that these would make nice mini blocks without having to do any additional cutting, so a plan began to take shape!
You will see throughout a lot of these pictures that I have 3 extra mini blocks in warm colors. I was going to use them for the back, but didn't like it in the end after I chose the binding, so just ignore those extras! I used 9 mini blocks for my project. It is bigger than a normal mouse pad, but that lets you actually see the blocks. If you wanted to make it smaller you could use fewer mini blocks.

Start by sewing the two small rectangles together and the two large rectangles together using a 1/4 inch seam. Then press the seams either to one side or apart. There are great debates about which is better. I don't claim to know which is better or to do it consistently, so you should do whatever you prefer.
Next, sew the small rectangles to the large rectangles with a 1/4 inch seam and press open.

Since my scraps were not exactly the same size (and because I don't always sew perfectly straight) I trimmed them up to make them approximately 2 x 3 inches.

I also had some strips of white sashing left over from the same baby quilt that were about 2 x 7 inches so I cut them in half and used them as sashing between the mini blocks (again using a 1/4 inch seam and pressing the seams).

I wanted to make it more square so I used 1.25 inch wide strips between the rows. As I mentioned before, I don't always sew straight, so for me, it is always helpful to square up my block at multiple stages. So, after putting all the blocks into rows and the rows into a bigger block I tried to make the edges straight and parallel.

I used the same 2 inch strips on the sides and then 1.25 inch strips across the top and squared up my block to be a final 10.5 x 10.5 inches.

You will also need something for the back and some batting. I used a scrap of white print cotton fabric left over from the first quilt I ever made back in college that was nearly the right size and just needed some trimming and a scrap of batting (this really was a scrap buster project!).

Cut the back and the batting the same size as the finished block. Layer them with the back right side down, the batting, and then the top right side up and pin together with safety pins.

Quilt together however you want. I outlined each of the mini blocks with white thread about 1/8 inch from the edge of the block. Then, I made a double helix - think DNA (did I mention I work in the field of genetics) to run vertically between each column of mini blocks and on the two edges.
Finally, I found the perfect fabric for the binding. It was a fat quarter that I picked up at Jo-Ann's as an impulse buy when I ran in for something else and it caught my eye in the sale bin. I cut my strips 2 inches wide for the binding. Here is a nice tutorial for quilt binding from Heather Bailey. I also really like many of the tutorials that Oh, Fransson! has here. In fact, her web site is also where I got the idea for the baby quilt these scraps came from!

Some potential modifications could be to make it smaller or to use stiff interfacing under the batting to make it more stiff like a typical mouse pad. Since it is large and my wrist rests on the edge, I haven't had any problems with it sliding around. However, if I had problems I was considering trying making dots of puffy paint on the back (kind of like those woven gloves that have grippy rubber dots on them). It had also crossed my mind that a person could use that rubber mesh looking stuff that is sometimes used to either line shelves or under rugs to keep them from slipping, but I don't think I need to do anything for this one.

Getting to see this beautiful fabric all day while I am at work really brightens my day!

Tuesday, September 29, 2009

Another dog vest expansion

I got a referral! Well, okay, maybe someone I know through my friend who I did the previous dog vest alteration for was there when I handed over the finished product and later asked me to do the same for her. But, I'm just telling myself that word is getting around about my excellent craftsmanship! Regardless, here is the second doggie vest expansion. I used some blue fabric from my stash that happened to match quite well and pieced together some scraps of cotton batting for the lining. I had to remove the velcro and move it slightly to fit the fabric that I had, but I think it will be okay since it will be on the under-side of the dog!


Sunday, September 27, 2009

Case for crochet hooks, makeup brushes, etc...


My stylist recently asked if I could make a pouch for her makeup brushes so that they wouldn't get the inside of her purse dirty. She suggested something similar to the sunglasses cases I made previously, but with the flap on the long side. However, after thinking about it, I decided to try it like this instead:

There is an elastic strap across so that makeup brushes (or in my case crochet hooks) can be held in place and can be easily accessed. You just fold it up and close it with the magnetic snap. I like this a lot, but I think I need to add some more stitching on the elastic to make the slots tighter for the smaller hooks. I tried some decorative stitches on the elastic, but had a lot of trouble with skipped stitches. I had the most luck with regular straight stitching. (If anyone knows any suggestions on how to avoid this on elastic, please share!) I would probably also move the elastic nearer to the middle next time. I was worried about getting too close to the snap, but I think I could have gone a little closer and still been okay. I have a few other ideas in mind for the makeup brushes, so I am going to make a few other options and take them in next time I get my hair cut to see which my stylist prefers. I just love getting suggestions of things to make and then figuring out how to make them!


Saturday, September 26, 2009

Magnet Update


So...it's been a while. But, here are the beer bottle cap magnets I said I was going to make. The glue took a long time to dry and then I was too lazy to take pictures. I finally took some pictures, so these will all be going in my shop soon (with the exception of the Blue Moon magnets that will be going to my friend Andrea). I have several projects in progress and several more new project ideas so I hope to have a lot more to post soon!