Sunday, August 30, 2009

Fabric Notebook Cover Tutorial


First of all, I have to apologize for the quality of some of these pictures. I didn't realize they weren't that great until after I was done. But, I think you can still get the idea of what I was trying to portray.

I started with this small binder I have had forever, but you could use any size notebook and adjust the measurements accordingly.

1) Measure the notebook you want to cover (mine is about 5 1/4 inches by 8 1/4 inches).

2) Cut a large rectangle of your outer fabric that is large enough to accommodate a 1/4 seam allowance on each side plus 1/8-1/4 inch around for the top stitching. (I failed to take the top stitching into account in my measurements so mine is pretty snug. I will provide example measurements of what I should have done.) For my notebook I needed 6 inches by 9 inches. If you aren't sure, I would recommend going a little larger rather than a little smaller since you really can't fit the notebook in there if it is too small.

3) Cut 2 small rectangles of coordinating fabric for the inner pockets. The size of the pocket depends on what you like and the size of your notebook. I wanted mine to cover about 2/3 of the notebook. These need to be the same measurement up and down as the other rectangle you just cut ( in my case 6 inches). Decide on the final width you want and add at least 7/8 inches for seam allowance, top stitching and the hem on the open side. I wanted mine to be 2 1/2 inches wide so each rectangle ended up 6 by 3 3/8 inches.

4) Cut a strip of coordinating fabric for the closure. Again, the size of this depends on the size of your notebook and your preferences, but I made mine about 1 3/4 inches wide and about 5 3/4 long. It was actually just a scrap that was left over from my other cutting and it looked about right so I used it.

5) Cut fusible interfacing the same size as your main fabric and the rectangles for the inner pockets and iron on (wrong sides together) as the package instructs. I used lightweight fusible interfacing. This is optional, but I think it helps give it just a little stiffness and form and also helps the lighter areas of the fabric from being see-through.

6) Iron a 1/4 inch double hem along the side that will be the open side of each of the inner pockets and sew.

7) Fold the strip that will be the closure in half, right sides together, and sew along the long side (1/4 inch seam). Then turn right side out and iron with the seam in the middle.

8) Position the closure strip onto the main fabric (right sides together). It will be on the part that will be the back of the notebook.
9) Layer the pocket piece on top of the outer fabric and closure (again the right side of the pocket should be facing the right side of the outer fabric and the hem should be towards the middle of the rectangle) and pin into place. Also pin the other pocket piece into place.
10) Stitch around each pocket piece from where the hemmed edge meets the outer fabric all the way around to the the other hemmed edge of the same pocket. Do this on each side and then turn right side out.

11) Fold in and iron the piece of outer fabric between the 2 pockets on top and bottom.

12) Top stitch (1/8) inch around the entire notebook cover.


13) Slip the notebook into the cover and determine where the button should be positioned and hand-stitch it on.


Saturday, August 22, 2009

Crocheted blanket for mom


I started this blanket for my mom around the end of May in 2008, so a little over a year ago. I mostly work on it while I am riding in the car on long trips, but I really want to have it done by Christmas time to give to my mom. As you can see here, I have about 7 and a half skeins of yarn left. I hope that is enough! I'll update on my progress periodically.


Thursday, August 20, 2009

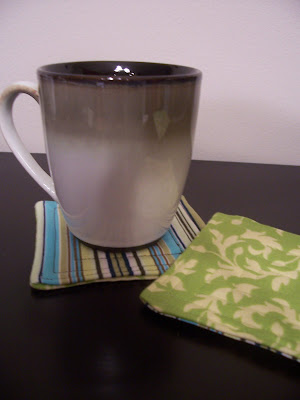
Quilted fabric coasters - lime/stripes


I made these coasters from the same fabric as the sunglasses case. I made one set of 3 that I took to work for my desk. The second set of 4 is now posted in my shop. For the first set I did one coaster each using lime green, navy, and chocolate thread for the quilting. I really liked the green on green, but preferred the navy or chocolate on the striped fabric. For the second set I used lime on the top thread and navy on the bottom so that I could have the best of both worlds!


Monday, August 17, 2009

Sunglasses case - third time's the charm

I made two more versions of the sunglasses case. The second one I made much bigger thinking that would be better for big sunglasses. As you can see, the large sunglasses fit without a problem. But, if you see it in person, it just seems too big. It measures about 4.25 inches by 8 inches.
The third case seems to be a pretty good size. My smaller sunglasses have plenty of room and the larger ones fit snugly inside. I'll probably post this case in my shop (if I can convince myself to give it up). I'll surely be making more sunglasses cases now that I have an acceptable pattern. I am still not sure what to do with the larger one, though. Maybe you could put a checkbook and pen inside? Maybe it will be a freebie? Any ideas?

Fabric and Frame Giveaway!

I really like these fabrics and they are being given away along with your choice of picture frame at lovely little handmades. I bet I could find something to do with them!!!

Sunday, August 16, 2009

Wet bags for baby

Thursday I shipped off my most recent baby gift - these wet bags. They are fabric bags lined in vinyl so that mom can throw dirty clothes, shoes, diapers etc. in them and keep the rest of the contents of the diaper bag dry. I had heard about wet bags that were lined with solid colored vinyl fabric, but I really wanted to line mine with a coordinating fabric that you could see. My first idea was to use a clear shower curtain over the inner fabric. When I went to the fabric store I found some clear vinyl sold by the yard, but they only had the really thin or really thick versions in stock. Then, as I was gathering my applique supplies, I spotted some iron-on vinyl! So, that is what I ended up using. The fabric is Robots by David Walker from Common Threads Quilt Shoppe.
My first attempt was the red bag. I made the inner bag taller than the outer so that I could cuff it over and put the draw-string in. I love the way this one looks with the shiny cuff, but as you can see, it just doesn't cinch up very well. You have to work with the draw string a little to get it very snug. I figure the functionality of being able to easily shut the bag will be more important to a mom dealing with a mess than the cute shiny appearance. So...
Attempt number 2 was the blue bag. This one I made the inner vinyl coated bag the same size as the outer and then added a separate non-vinyl cuff for the draw string. I had some trouble with this because the vinyl is slippery and the bag just barely fit over the base of my sewing machine. I needed to pin it, but didn't want to poke holes in the vinyl so I tried using binding clips like you would to attach binding to a quilt, but they ended up sliding around. So, the stitching on the cuff isn't the best. However, it does cinch shut quite nicely.
Final attempt - striped bag. This time I used a similar method as the blue bag, but I sewed the cuff to the inner bag before putting it together and then folded it over so that it held in place better. This worked much better, but I thought I was being clever by making the inner bag a little bit smaller (width) so that it fit inside the other bag better, but that meant that it was hard to make the cuff fold over the larger outer bag. Again, the stitching on the cuff is not as nice as I would like. But, the good news is, this was also my first time to try applique and I think it was pretty good for my first attempt (if I do say so myself!). I followed the instructions by Elizabeth from Oh, Fransson! on Sew, Mama, Sew!. It was pretty straight forward with such good instructions! I have a feeling I will be doing that again!
I did wash and dry the red bag in my washer and dryer. It seemed okay, but I was worried about the vinyl separating from the fabric so I turned it inside out, covered it in parchment paper and ironed it again to be sure they were still fused. I think it is okay to wash and dry if needed, but they will probably last longer if they are just wiped out or hand washed most of the time. Hopefully, these will be useful bags. I would love to hear some suggestions on how to make these better. I might make more in the future, and am also considering using vinyl coated fabric to line a makeup bag.

Friday, August 14, 2009

Crocheted can and bottle koozies

In college a friend suggested I crochet a beer koozy. I thought the idea was so silly because it was such an oxymoron, so I had to try it. I can't believe how many people have asked me where to get them when I use one. So, I decided it was time to put some in my Etsy shop. These 4 are all posted there. I plan to continue to post more there regularly. I have a few more multi-colored yarns and a bunch of solids that I am planning to use. I have done some custom designs in the past (Dean's Beer embroidery) and have some ideas for more customization for the future. I'll be posting about those once I try it out.
Last night, my husband suggested a bottle koozy. Here is my prototype. It is listed in my Etsy shop as well. I am pretty happy with how it turned out. I just hope I can re-create it! The bottom is open so it slips over the top of the bottle. I haven't tried it out, so I am hoping there isn't a problem with the bottle slipping out the bottom.

Matching can and bottle koozies!

Sunday, August 9, 2009

Homemade sunglasses case prototype

As Andrea suggested, I made a sunglasses case. The inner fabric is left over from the multi-color baby quilt and the outer fabric is left over from another project I will post about soon. It is lined with a very heavy interfacing that gives it a nice stiffness that would protect the sunglasses, but makes it kind of rigid, so it probably needs to be bigger to accommodate other sunglasses. Mine fit, but it is a snug fit and they aren't that big. The flap closes with Velcro.

All in all, I am pretty happy with it other than the size. Also, I am not satisfied with the top stitching and how it lined up. I think next time I won't top stitch until I put the pieces together so I don't have the problem with the stitches lining up like in the picture below. I also thought about using clear thread, but I kind of like the stitching contrast so I think I'll try it that way again. I am also not sure if I like the stitching from the Velcro showing on the top of the flap. I might attach the Velcro to the inner fabric before I put it together so that it doesn't show on the outside. I might also consider a non-flap version. Please leave me a comment if you have any suggestions!

Saturday, August 8, 2009

More crocheted coasters


I had to make some more coasters from this yarn. This time I went for rippled squares. I just love the texture and think it is a nice contrast on a smooth table. They are up for grabs in my Etsy shop!